

One-to-one with Technology in Kindergarten: Part 2 is the second installment of my technology journey. At this stage, I am sitting pretty with a few iPads for my classroom. Things are going smoothly, but there is still so much to learn and management issues to solve. (You can read about Part 1 here.)
Adding to Technology: One-to-one with Technology in Kindergarten
I was able to add my first school-funded device with Teacher of the Year funds. This is a humorous story in itself. Years ago, no one in my entire county had purchased an iPad using school funds, and specifically Teacher of the Year funds, before me. The school system wanted to make sure I wasn’t planning on using the device for personal use, but rather for my students. It sounds laughable now, but years ago using iPads in the classroom wasn’t nearly as common as it is now. I actually had to be pushy to get the purchase order to clear through! When you hit a technology roadblock, keep pushing for what you know is right. After several conversations and pushes for approval, I was given the go-ahead to purchase an iPad and an iPod with TOTY funds. Furthermore, I had to do the work so that others are now able to purchase the devices if they choose to.
Mixing Devices: One-to-one with Technology in Kindergarten
Once I reached a total of 6 devices, 3 iPads, and 3 iPods, I was able to create an iPad table for technology. That meant half of my students were able to use iPads and the others only got iPods. I often get asked if my students complained about using an iPod versus an iPad. They did not. I honestly and truly believe my students were so excited to have devices in general that they did not complain at all! My point, some technology is better than no technology.
Introducing a Technology Table
The idea of a technology table came when I knew I had enough devices to allow a small group to use technology at one, without teacher support. Essentially, this meant EACH of my students would be able to use technology regularly and often. This also eliminated the need to chart and track student usage on devices.
When I first introduced the technology table, I explained to my class that each device would STAY at that spot each and every time we came to that table. Each student had their name at their spot. Students could and would only go to their spot and their device. Why? Their games would only be on THAT device. Period.

There was a technology lesson to be learned when mixing iPads and iPods. You can not search for iPad apps when you are on an iPhone/iPod. Why? Because you can only “see” iPod apps. Keep in mind that you can see both iPod/iPhone options on an iPad. Some apps have a version an iPod version and an iPad version. I had to MAKE SURE I purchased the iPod/iPhone version since I was utilizing both types of devices.
Integrating a Technology Station
Integrating a technology table was amazing for my students and presented me with new technology challenges. I loved that all my students would be able to use technology regularly. But, I had to make sure each student KNEW how to do basic things with their devices and troubleshoot with NO help. I could not stop what I was doing to turn up or down the volume each time groups changed. Since my first group had iPad help with me while I was assessing, they knew how to use devices fairly well. But for the next school year I would go through iPad lessons called iPad 101 before opening the technology table. I would teach my students to turn on and off their devices, control the volume, open apps, close apps, and headset use. Most importantly, I inform my students that NOT hearing me with headsets will never be an excuse. If you can’t hear me with headsets on, you will not be allowed to play on devices. I would teach iPad 101 one day, then let them practice device use with me around the next day.
Next, I had to figure out how to get each child to KNOW what app to play or where I wanted to them to go. No, I was not going to give my students free iPad time each day. Their digital time needed to be tied into the learning that was going on in the classroom. Period.
Setting Up Each Device
The first thing I learned to do was organize EACH device with apps in the same order. This made it easy for me to double-check that each device had a specific app on it and it made it each student to find that specific app as well. If an app accidentally got deleted, I could quickly find it and add it back.
At first, I started just showing my students an app and how to play it. During their technology station, they would have to go to that app during their technology time to work with it. But, Kindergarten kids easily forget where to do. And apps started expanding on their brands and making a series of apps that all look similar but focus on different skills. My students would easily get off track and forget about what app they were supposed to be playing.
I know what you are thinking, my students were intentionally off track. This is true for some of the time, but when almost all my students struggled with finding and remembering what app to go to and play, that is a management issue instead of a behavioral problem. I simply had to find a good way to manage app usage. Some people suggested using an accessibility structure on apps called Guided Access. It traps the user into that app so they can not click off.
Is Guided Access for Me?
For some students, I can see the appeal of enabling Guided Access, but I am not going to go through all the clicks to lock the app in for each device in my classroom each day for technology. That seems ridiculous to me. I needed a way for my students to gain responsibility and accountability. If I can’t trust them to go to a learning game to play, I can’t trust them on the device. I learned that Guided Access is not for me long term.
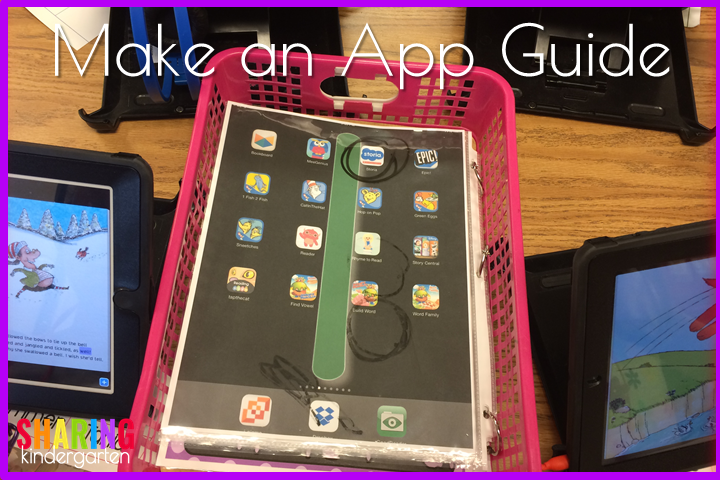
App Guide
My solution was to create an App Guide. This is a simple screenshot of EACH page on an iPad printed out in color. All the sheets go into a page protector. I connect the page protector with binder rings. Then I circle the app I want my students to play with a dry-erase marker. I can switch out the game I want them to play by erasing the old game and circling the new game. I also learned to use the app guide during iPad 101 to teach my students HOW to find and start playing a game.
Motivation to Stay on Track
To start the school year, I would show my students how to play a game. My students would play specific games Monday, Tuesday, Wednesday, and Thursday. Since they only for a few minutes each day, this was a good time for skill building. If my students follow my directions and play what I say, they get an open-choice app selection on Friday. Since I only have educational apps on their devices, this is a win-win. I also strongly feel students are going to explore apps on their own. This is the curiosity and nature of a child. But allowing them to earn the privilege to do this motivates them to stay on track and earn this time. If I have a student that does not play what I require on Monday, Tuesday, Wednesday, or Thursday, they play it on Friday. I write it down and remind them. It is as simple as that.
I could really use help with 1:1…apps and set up